> ## Documentation Index
> Fetch the complete documentation index at: https://docs.langchain.com/llms.txt
> Use this file to discover all available pages before exploring further.
# Alerts in LangSmith
**Self-hosted version requirement**: Access to alerts requires Helm chart version **0.10.3** or later.
Effective observability in LLM applications requires proactive detection of failures, performance degradations, and regressions. LangSmith's alerts feature helps identify critical issues such as:
* API rate limit violations from model providers.
* Latency increases for your application.
* Application changes that affect feedback scores reflecting end-user experience.
* Unexpected cost spikes from LLM usage.
Alerts in LangSmith are project-scoped, requiring separate configuration for each monitored project.
Alerts can [route](#step-4-configure-notification-channel) to Slack, PagerDuty, Dynatrace, or any HTTP endpoint via webhook. The **Webhook** tab includes [example recipes](#example-recipes) for Microsoft Teams, email, and Slack on self-hosted deployments.
Follow these steps to configure an alert.
## Step 1: Navigate to create alert
In the [UI](https://smith.langchain.com?utm_source=docs\&utm_medium=cta\&utm_campaign=langsmith-signup\&utm_content=langsmith-alerts), navigate to the Tracing project that you would like to configure alerts for. Click the **Alerts** icon on the top right-hand corner of the page to view existing alerts for that project and set up a new alert.
## Step 2: Select metric type
LangSmith provides threshold-based alerting on the following metrics:
| Metric Type | Description | Use Case |
| ------------------ | --------------------------------------------------------------------------------------------------------------------- | -------------------------------------------------------------------------------------------------------------------------------------------------------------------- |
| **Run Count** | Tracks the total number of [runs](/langsmith/observability-concepts#runs) over a time window. | Monitor whether a pipeline is producing runs at the expected volume and alert when it drops unexpectedly. |
| **Cost** | Tracks the total cost of runs over a time window. | Monitor LLM spending to alert when costs exceed expected thresholds. Requires [cost tracking](/langsmith/cost-tracking) to be configured. |
| **Errors** | Tracks runs with an error status. Alert on total error count or error percent (rate of errored runs out of all runs). | Monitor for failures in an application, or alert when the error rate exceeds an acceptable threshold. |
| **Feedback Score** | Measures the average feedback score. | Track [feedback from end users](/langsmith/attach-user-feedback) or [online evaluation results](/langsmith/online-evaluations-llm-as-judge) to alert on regressions. |
| **Latency** | Measures average run execution time. | Tracks the latency of your application to alert on spikes and performance bottlenecks. |
Additionally, for **Errors** and **Latency**, you can use the filter builder to stack conditions on fields such as **Status**, **Run Type**, **Tag**, and **Error**. For example, you can scope an error alert to runs where **Status** is `error`, **Run Type** is `llm`, **Tag** is `support_agent`, and **Error** matches `RateLimitExceeded`.
## Step 3: Define alert conditions
Alert conditions consist of several components:
* **Aggregation Method**: Average, Percentage, or Count.
* **Comparison Operator**: `>=`, `<=`, or exceeds threshold.
* **Threshold Value**: Numerical value triggering the alert.
* **Aggregation Window**: Time period for metric calculation (choose between 5 or 15 minutes).
* **Feedback Key** (Feedback Score alerts only): Specific feedback metric to monitor.

**Example:** The configuration in the screenshot would generate an alert when more than 5% of runs within the past 5 minutes result in errors.
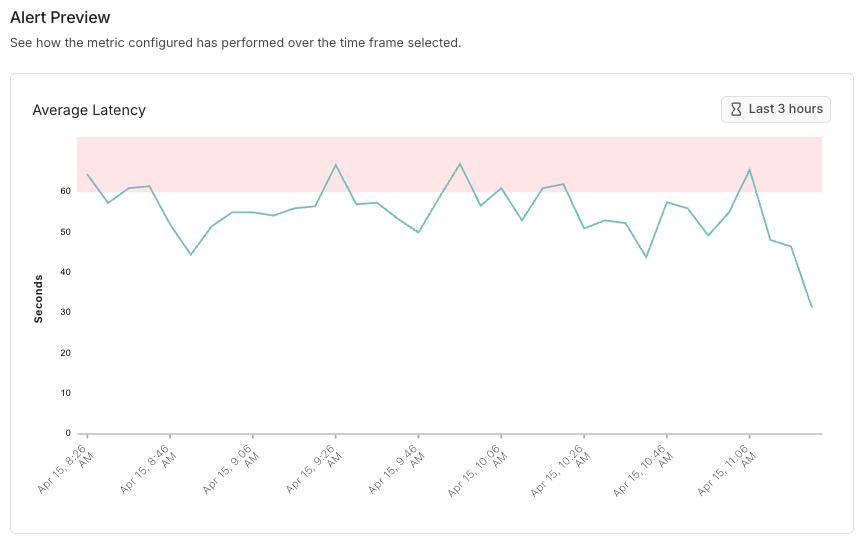
You can preview alert behavior over a historical time window to understand how many datapoints, and which ones, would have triggered an alert at a chosen threshold (indicated in red). For example, setting an average latency threshold of 60 seconds for a project lets you visualize potential alerts, as shown in the following screenshot.
## Step 4: Configure notification channel
Send alert notifications directly to a Slack channel using LangSmith's native Slack integration. No custom webhook or Slack app configuration required.
The native Slack notification type is available on LangSmith Cloud only. For self-hosted deployments, use the [webhook Slack recipe](#example-recipes) in the **Webhook** tab instead.
**Prerequisites**
* A Slack workspace connected to your LangSmith organization. If you haven't connected one yet, LangSmith will prompt you to do so inline when you configure this notification type.
### 1. Configure the Slack notification
1. In the **Notification Settings** section of your alert setup, select **Slack**.
2. Click the channel selector. If no Slack workspace is linked yet, click **Connect Slack** and complete the OAuth flow to authorize LangSmith.
3. Add the `@LangSmith` app to the channel you want to receive notifications in. The app must be a member of the channel — type `/invite @LangSmith` in the channel to add it.
4. Select the workspace and channel from the dropdown. Click the refresh icon if the channel does not appear immediately.
5. Click **Save** to save the notification configuration.
### 2. Test the integration
Click **Send Test Notification** to verify that LangSmith can reach the channel. Check the channel for the test message.
### Notification format
When an alert triggers, LangSmith posts a structured Slack message that includes:
* **Headline**: The alert name and your LangSmith workspace name.
* **Detail line**: The metric attribute, triggered value, comparison operator, configured threshold, aggregation method, and time window — for example: `Total Cost: $12.50 ≥ $5.00 · avg · 30 min`.
* **Action buttons**: **View Alert** (links to the alert preview in LangSmith) and **View Runs** (links to the filtered runs that triggered the alert).
Configure PagerDuty as a notification channel using PagerDuty's [Events API v2](https://developer.pagerduty.com/docs/events-api-v2-overview). This integration allows critical LLM application issues to trigger PagerDuty incidents, enabling rapid response through your established incident management workflow.
**Prerequisites**
* An active PagerDuty account with administrator access
* Appropriate service-level permissions in PagerDuty
If on a custom deployment of LangSmith, make sure there are no firewall settings blocking egress traffic from LangSmith services.
### 1. Create a Service in PagerDuty
1. Log in to your PagerDuty account
2. Navigate to **Services → Service Directory**
3. Click **+ New Service**
4. Complete the following fields:
* **Name**: Provide a descriptive name (e.g., "LangSmith Monitoring")
* **Description**: Add details about the monitored application
* **Escalation Policy**: Select the appropriate team escalation policy
* **Integration Type**: Select "Events API V2"
5. Click **Add Service** to create the service
### 2. Obtain integration key
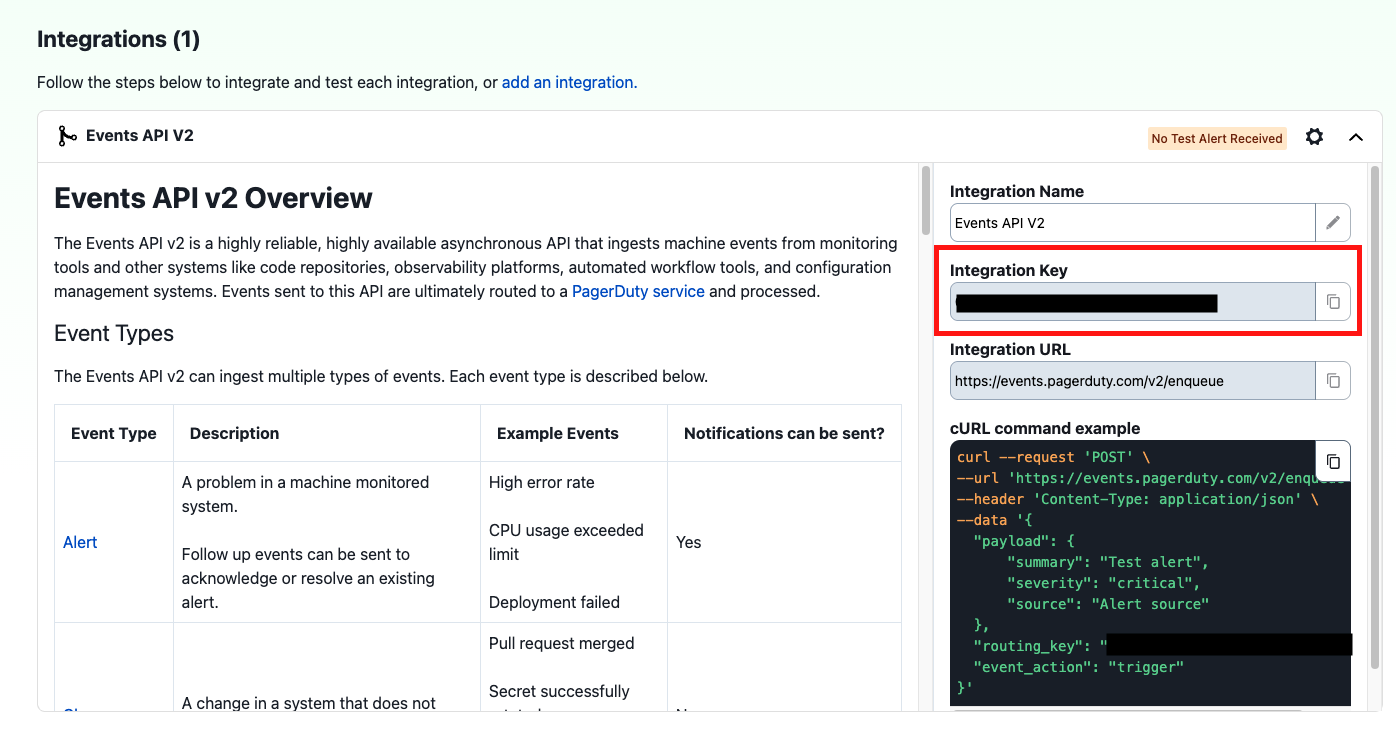
After creating the service, retrieve the Integration Key:
1. From the **Service Directory**, locate and click on your newly created service
2. Select the **Integrations** tab
3. Find the "Events API V2" integration
4. Copy the **Integration Key** (a 32-character alphanumeric string)
 ### 3. Configure LangSmith alert with PagerDuty
To receive the same alert again within an hour of it being triggered, you must resolve the active incident created by the alert in PagerDuty.
### 3. Configure LangSmith alert with PagerDuty
To receive the same alert again within an hour of it being triggered, you must resolve the active incident created by the alert in PagerDuty.
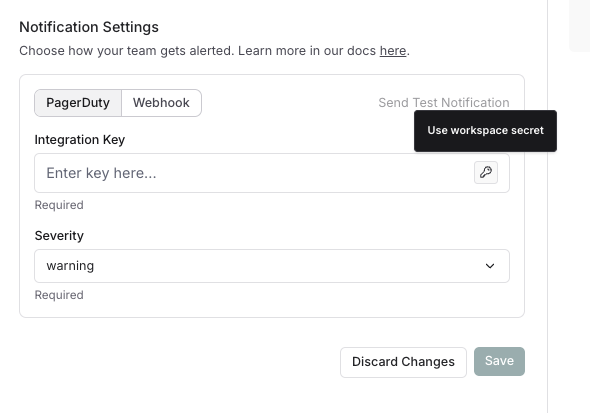 1. In the notification section of your alert set-up in LangSmith, select **PagerDuty**
2. Click the key icon to save the Integration Key as a Workspace secret or select an existing Workspace secret. As a best practice, we recommend saving the Integration Key as a Workspace Secret rather than adding it directly. This will allow you to reuse the same key across alerts for a workspace.
3. Configure additional notification options:
* **Severity**: Maps to PagerDuty incident priority
4. Send a test alert by clicking **Send Test Alert**
5. Verify the incident is triggered by PagerDuty and contains relevant LangSmith alert information
### Troubleshooting
If incidents aren't being created in PagerDuty:
* Verify the Integration Key is entered correctly in LangSmith
* Ensure the PagerDuty service is active and not in maintenance mode
* Check that your PagerDuty account has Events API v2 enabled
* If an alert trigger appears to be missing in PagerDuty, check whether the expected trigger occurred within one hour of a previous trigger from the same alert rule, and whether the incident created by the previous alert is still open.
* Review network connectivity if your LangSmith instance is behind a firewall
### Additional resources
* [PagerDuty Events API v2 Documentation](https://developer.pagerduty.com/docs/events-api-v2/overview/)
* [PagerDuty Integration Guide](https://support.pagerduty.com/docs/services-and-integrations)
Configure Dynatrace as a notification channel using Dynatrace's [Events API v2](https://docs.dynatrace.com/docs/dynatrace-api/environment-api/events-v2/post-event). This integration sends LangSmith alert events to your Dynatrace environment, enabling correlation with your broader infrastructure monitoring.
**Prerequisites**
* An active Dynatrace environment (SaaS or Managed).
* A Dynatrace API access token with the `events.ingest` scope.
If you're working from a custom [deployment](/langsmith/self-hosted) of LangSmith, make sure there are no firewall settings blocking egress traffic from LangSmith services.
### 1. Create an API token in Dynatrace
1. Log in to your Dynatrace environment.
2. Navigate to **Access Tokens**.
3. Click **Generate new token**.
4. Provide a descriptive name (e.g., "LangSmith Alerts").
5. Under **Scopes**, search for and enable `events.ingest` (Ingest events).
6. Click **Generate token**.
7. Copy the generated token and store it securely. The token is only displayed once.
### 2. Obtain your Dynatrace environment URL
Your Dynatrace environment URL follows this format:
```
https://{your-environment-id}.live.dynatrace.com
```
You can find your environment ID in the browser URL bar when logged in to Dynatrace.
### 3. Configure LangSmith alert with Dynatrace
1. In the **Notifications Settings** for your alert setup in LangSmith, select **Dynatrace**.
2. Enter your Dynatrace environment URL.
3. Click the key icon to save the API token as a workspace secret or select an existing workspace secret. As a best practice, save the API token as a workspace secret rather than adding it directly. This allows you to reuse the same token across alerts for a workspace.
4. Configure additional notification options:
* **Event Type**: Select the Dynatrace event type (e.g., `CUSTOM_ALERT`, `ERROR_EVENT`)
5. Send a test alert by clicking **Send Test Notification**.
6. Verify the event appears in your Dynatrace environment.
### Troubleshooting
If events aren't appearing in Dynatrace:
* Verify the API token has the `events.ingest` scope and is not expired.
* Ensure the environment URL is correct and includes your environment ID.
* Confirm the `Authorization` header format uses `Api-Token` (not `Bearer`).
* Check that your Dynatrace environment is active and accessible.
* Review network connectivity if your LangSmith instance is behind a firewall.
### Additional resources
* [Dynatrace Events API v2 Documentation](https://docs.dynatrace.com/docs/dynatrace-api/environment-api/events-v2/post-event)
* [Dynatrace Access Tokens](https://docs.dynatrace.com/docs/manage/access-control/access-tokens)
Webhooks enable integration with custom services and third-party platforms by sending HTTP POST requests when alert conditions are triggered. Use webhooks to forward alert data to ticketing systems, chat applications, or custom monitoring solutions.
**Prerequisites**
* An endpoint that can receive HTTP POST requests
* Appropriate authentication credentials for your receiving service (if required)
### 1. Prepare your receiving endpoint
Before configuring the webhook in LangSmith, ensure your receiving endpoint:
* Accepts HTTP POST requests
* Can process JSON payloads
* Is accessible from external services
* Has appropriate authentication mechanisms (if required)
If on a custom deployment of LangSmith, make sure there are no firewall settings blocking egress traffic from LangSmith services.
### 2. Configure webhook parameters
In the **Monitoring** section of the [LangSmith UI](https://smith.langchain.com?utm_source=docs\&utm_medium=cta\&utm_campaign=langsmith-signup\&utm_content=langsmith-alerts) under the **Alerts** tab, click **+ Alert** to create a. new alert.
In the **Notification Settings** section, complete the webhook configuration with the following parameters:
**Required fields**
* **URL**: The complete URL of your receiving endpoint
* Example: `https://api.example.com/incident-webhook`
**Optional fields**
* **Headers**: JSON key-value pairs sent with the webhook request
* Common headers include:
* `Authorization`: For authentication tokens
* `Content-Type`: Usually set to `application/json` (default)
* `X-Source`: To identify the source as LangSmith
* If no headers, use `{}`
* **Request Body Template**: Customize the JSON payload sent to your endpoint
* Default: LangSmith sends the payload defined and the following additional key-value pairs appended to the payload:
* `project_name`: Name of the triggered alert
* `alert_rule_id`: A UUID to identify the LangSmith alert. This can be used as a de-duplication key in the webhook service.
* `alert_rule_name`: The name of the alert rule.
* `alert_rule_type`: The type of alert (as of 04/01/2025 all alerts are of type `threshold`).
* `alert_rule_attribute`: The attribute associated with the alert rule - `error_count`, `feedback_score`, `latency`, or `cost`.
* `triggered_metric_value`: The value of the metric at the time the threshold was triggered.
* `triggered_threshold`: The threshold that triggered the alert.
* `timestamp`: The timestamp that triggered the alert.
LangSmith does not perform template substitution on the request body. The auto-populated fields above are merged into the outgoing JSON as top-level keys, alongside the body you configure. Placeholder syntax like `{alert_rule_name}` is sent verbatim to the receiving service. It only resolves to a real value if the receiver itself can extract fields from the incoming JSON (for example, a Power Automate Workflow, an AWS Lambda, or a custom HTTP handler).
### 3. Test the webhook
Click **Send Test Alert** to send the webhook notification to ensure the notification works as intended.
### Troubleshooting
If webhook notifications aren't being delivered:
* Verify the webhook URL is correct and accessible
* Ensure any authentication headers are properly formatted
* Check that your receiving endpoint accepts POST requests
* Examine your endpoint's logs for received but rejected requests
* Verify your custom payload template is valid JSON format
### Security considerations
* Use HTTPS for your webhook endpoints
* Implement authentication for your webhook endpoint
* Consider adding a shared secret in your headers to verify webhook sources
* Validate incoming webhook requests before processing them
### Example recipes
Here is an example for configuring LangSmith alerts to send notifications to Slack channels using the [`chat.postMessage`](https://api.slack.com/methods/chat.postMessage) API.
**Prerequisites**
* Access to a Slack workspace.
* A LangSmith project to set up alerts.
* Permissions to create Slack applications.
**Step 1: Create a Slack app**
1. Visit the [Slack API Applications page](https://api.slack.com/apps).
2. Click **Create New App**.
3. Select **From scratch**.
4. Provide an **App Name** (e.g., "LangSmith Alerts").
5. Select the workspace where you want to install the app.
6. Click **Create App**.
**Step 2: Configure bot permissions**
1. In the left sidebar of your Slack app configuration, click **OAuth & Permissions**.
2. Scroll down to **Bot Token Scopes** under **Scopes** and click **Add an OAuth Scope**.
3. Add the following scopes:
* `chat:write` (Send messages as the app).
* `chat:write.public` (Send messages to channels the app isn't in).
* `channels:read` (View basic channel information).
**Step 3: Install the app to your workspace**
1. Scroll up to the top of the **OAuth & Permissions** page.
2. Click **Install to Workspace**.
3. Review the permissions and click **Allow**.
4. Copy the **Bot User OAuth Token** that appears (begins with `xoxb-`).
**Step 4: Add the bot to a Slack channel**
Add the bot to the specific channel you want to receive alerts in. You can add a bot to a Slack channel by mentioning it in the message field (e.g., `@botname`).
You also need the channel ID to configure the webhook alert in LangSmith. You can find the channel ID by opening channel details > About.
**Step 5: Configure the webhook alert in LangSmith**
1. In LangSmith, navigate to your project.
2. Select **Alerts → Create Alert**.
3. Define your alert metrics and conditions.
4. In the notification section, select **Webhook**.
5. Configure the webhook with the following settings:
**Webhook URL**
```json theme={"theme":{"light":"catppuccin-latte","dark":"catppuccin-mocha"}}
https://slack.com/api/chat.postMessage
```
**Headers**
Replace `xoxb-your-token-here` with your Bot's User OAuth Token
```json theme={"theme":{"light":"catppuccin-latte","dark":"catppuccin-mocha"}}
{
"Content-Type": "application/json",
"Authorization": "Bearer xoxb-your-token-here"
}
```
**Request Body Template**
It is required to fill in the `{channel_id}` from the value found in Step 4.
1. In the notification section of your alert set-up in LangSmith, select **PagerDuty**
2. Click the key icon to save the Integration Key as a Workspace secret or select an existing Workspace secret. As a best practice, we recommend saving the Integration Key as a Workspace Secret rather than adding it directly. This will allow you to reuse the same key across alerts for a workspace.
3. Configure additional notification options:
* **Severity**: Maps to PagerDuty incident priority
4. Send a test alert by clicking **Send Test Alert**
5. Verify the incident is triggered by PagerDuty and contains relevant LangSmith alert information
### Troubleshooting
If incidents aren't being created in PagerDuty:
* Verify the Integration Key is entered correctly in LangSmith
* Ensure the PagerDuty service is active and not in maintenance mode
* Check that your PagerDuty account has Events API v2 enabled
* If an alert trigger appears to be missing in PagerDuty, check whether the expected trigger occurred within one hour of a previous trigger from the same alert rule, and whether the incident created by the previous alert is still open.
* Review network connectivity if your LangSmith instance is behind a firewall
### Additional resources
* [PagerDuty Events API v2 Documentation](https://developer.pagerduty.com/docs/events-api-v2/overview/)
* [PagerDuty Integration Guide](https://support.pagerduty.com/docs/services-and-integrations)
Configure Dynatrace as a notification channel using Dynatrace's [Events API v2](https://docs.dynatrace.com/docs/dynatrace-api/environment-api/events-v2/post-event). This integration sends LangSmith alert events to your Dynatrace environment, enabling correlation with your broader infrastructure monitoring.
**Prerequisites**
* An active Dynatrace environment (SaaS or Managed).
* A Dynatrace API access token with the `events.ingest` scope.
If you're working from a custom [deployment](/langsmith/self-hosted) of LangSmith, make sure there are no firewall settings blocking egress traffic from LangSmith services.
### 1. Create an API token in Dynatrace
1. Log in to your Dynatrace environment.
2. Navigate to **Access Tokens**.
3. Click **Generate new token**.
4. Provide a descriptive name (e.g., "LangSmith Alerts").
5. Under **Scopes**, search for and enable `events.ingest` (Ingest events).
6. Click **Generate token**.
7. Copy the generated token and store it securely. The token is only displayed once.
### 2. Obtain your Dynatrace environment URL
Your Dynatrace environment URL follows this format:
```
https://{your-environment-id}.live.dynatrace.com
```
You can find your environment ID in the browser URL bar when logged in to Dynatrace.
### 3. Configure LangSmith alert with Dynatrace
1. In the **Notifications Settings** for your alert setup in LangSmith, select **Dynatrace**.
2. Enter your Dynatrace environment URL.
3. Click the key icon to save the API token as a workspace secret or select an existing workspace secret. As a best practice, save the API token as a workspace secret rather than adding it directly. This allows you to reuse the same token across alerts for a workspace.
4. Configure additional notification options:
* **Event Type**: Select the Dynatrace event type (e.g., `CUSTOM_ALERT`, `ERROR_EVENT`)
5. Send a test alert by clicking **Send Test Notification**.
6. Verify the event appears in your Dynatrace environment.
### Troubleshooting
If events aren't appearing in Dynatrace:
* Verify the API token has the `events.ingest` scope and is not expired.
* Ensure the environment URL is correct and includes your environment ID.
* Confirm the `Authorization` header format uses `Api-Token` (not `Bearer`).
* Check that your Dynatrace environment is active and accessible.
* Review network connectivity if your LangSmith instance is behind a firewall.
### Additional resources
* [Dynatrace Events API v2 Documentation](https://docs.dynatrace.com/docs/dynatrace-api/environment-api/events-v2/post-event)
* [Dynatrace Access Tokens](https://docs.dynatrace.com/docs/manage/access-control/access-tokens)
Webhooks enable integration with custom services and third-party platforms by sending HTTP POST requests when alert conditions are triggered. Use webhooks to forward alert data to ticketing systems, chat applications, or custom monitoring solutions.
**Prerequisites**
* An endpoint that can receive HTTP POST requests
* Appropriate authentication credentials for your receiving service (if required)
### 1. Prepare your receiving endpoint
Before configuring the webhook in LangSmith, ensure your receiving endpoint:
* Accepts HTTP POST requests
* Can process JSON payloads
* Is accessible from external services
* Has appropriate authentication mechanisms (if required)
If on a custom deployment of LangSmith, make sure there are no firewall settings blocking egress traffic from LangSmith services.
### 2. Configure webhook parameters
In the **Monitoring** section of the [LangSmith UI](https://smith.langchain.com?utm_source=docs\&utm_medium=cta\&utm_campaign=langsmith-signup\&utm_content=langsmith-alerts) under the **Alerts** tab, click **+ Alert** to create a. new alert.
In the **Notification Settings** section, complete the webhook configuration with the following parameters:
**Required fields**
* **URL**: The complete URL of your receiving endpoint
* Example: `https://api.example.com/incident-webhook`
**Optional fields**
* **Headers**: JSON key-value pairs sent with the webhook request
* Common headers include:
* `Authorization`: For authentication tokens
* `Content-Type`: Usually set to `application/json` (default)
* `X-Source`: To identify the source as LangSmith
* If no headers, use `{}`
* **Request Body Template**: Customize the JSON payload sent to your endpoint
* Default: LangSmith sends the payload defined and the following additional key-value pairs appended to the payload:
* `project_name`: Name of the triggered alert
* `alert_rule_id`: A UUID to identify the LangSmith alert. This can be used as a de-duplication key in the webhook service.
* `alert_rule_name`: The name of the alert rule.
* `alert_rule_type`: The type of alert (as of 04/01/2025 all alerts are of type `threshold`).
* `alert_rule_attribute`: The attribute associated with the alert rule - `error_count`, `feedback_score`, `latency`, or `cost`.
* `triggered_metric_value`: The value of the metric at the time the threshold was triggered.
* `triggered_threshold`: The threshold that triggered the alert.
* `timestamp`: The timestamp that triggered the alert.
LangSmith does not perform template substitution on the request body. The auto-populated fields above are merged into the outgoing JSON as top-level keys, alongside the body you configure. Placeholder syntax like `{alert_rule_name}` is sent verbatim to the receiving service. It only resolves to a real value if the receiver itself can extract fields from the incoming JSON (for example, a Power Automate Workflow, an AWS Lambda, or a custom HTTP handler).
### 3. Test the webhook
Click **Send Test Alert** to send the webhook notification to ensure the notification works as intended.
### Troubleshooting
If webhook notifications aren't being delivered:
* Verify the webhook URL is correct and accessible
* Ensure any authentication headers are properly formatted
* Check that your receiving endpoint accepts POST requests
* Examine your endpoint's logs for received but rejected requests
* Verify your custom payload template is valid JSON format
### Security considerations
* Use HTTPS for your webhook endpoints
* Implement authentication for your webhook endpoint
* Consider adding a shared secret in your headers to verify webhook sources
* Validate incoming webhook requests before processing them
### Example recipes
Here is an example for configuring LangSmith alerts to send notifications to Slack channels using the [`chat.postMessage`](https://api.slack.com/methods/chat.postMessage) API.
**Prerequisites**
* Access to a Slack workspace.
* A LangSmith project to set up alerts.
* Permissions to create Slack applications.
**Step 1: Create a Slack app**
1. Visit the [Slack API Applications page](https://api.slack.com/apps).
2. Click **Create New App**.
3. Select **From scratch**.
4. Provide an **App Name** (e.g., "LangSmith Alerts").
5. Select the workspace where you want to install the app.
6. Click **Create App**.
**Step 2: Configure bot permissions**
1. In the left sidebar of your Slack app configuration, click **OAuth & Permissions**.
2. Scroll down to **Bot Token Scopes** under **Scopes** and click **Add an OAuth Scope**.
3. Add the following scopes:
* `chat:write` (Send messages as the app).
* `chat:write.public` (Send messages to channels the app isn't in).
* `channels:read` (View basic channel information).
**Step 3: Install the app to your workspace**
1. Scroll up to the top of the **OAuth & Permissions** page.
2. Click **Install to Workspace**.
3. Review the permissions and click **Allow**.
4. Copy the **Bot User OAuth Token** that appears (begins with `xoxb-`).
**Step 4: Add the bot to a Slack channel**
Add the bot to the specific channel you want to receive alerts in. You can add a bot to a Slack channel by mentioning it in the message field (e.g., `@botname`).
You also need the channel ID to configure the webhook alert in LangSmith. You can find the channel ID by opening channel details > About.
**Step 5: Configure the webhook alert in LangSmith**
1. In LangSmith, navigate to your project.
2. Select **Alerts → Create Alert**.
3. Define your alert metrics and conditions.
4. In the notification section, select **Webhook**.
5. Configure the webhook with the following settings:
**Webhook URL**
```json theme={"theme":{"light":"catppuccin-latte","dark":"catppuccin-mocha"}}
https://slack.com/api/chat.postMessage
```
**Headers**
Replace `xoxb-your-token-here` with your Bot's User OAuth Token
```json theme={"theme":{"light":"catppuccin-latte","dark":"catppuccin-mocha"}}
{
"Content-Type": "application/json",
"Authorization": "Bearer xoxb-your-token-here"
}
```
**Request Body Template**
It is required to fill in the `{channel_id}` from the value found in Step 4.
The remaining fields: `alert_name`, `project_name` and `project_url` optionally add additional context to the alert message. You can find your `project_url` in the browser's URL bar. Copy the portion up to but not including any query parameters.
```json theme={"theme":{"light":"catppuccin-latte","dark":"catppuccin-mocha"}}
{
"channel": "{channel_id}",
"text": "{alert_name} triggered for {project_name}",
"blocks": [
{
"type": "section",
"text": {
"type": "mrkdwn",
"text": "🚨{alert_name} has been triggered"
}
},
{
"type": "section",
"text": {
"type": "mrkdwn",
"text": "Please check the following link for more information:"
}
},
{
"type": "section",
"text": {
"type": "mrkdwn",
"text": "<{project-url}|View in LangSmith>"
}
}
]
}
```
6. Click **Save** to activate the webhook configuration.
**Step 6: Test the integration**
1. In the LangSmith alert configuration, click **Test Alert**.
2. Check your specified Slack channel for the test notification.
3. Verify that the message contains the expected alert information.
**(Optional) Step 7: Link to the alert preview in the request body**
After creating an alert, you can optionally link to its preview in the webhook's request body.
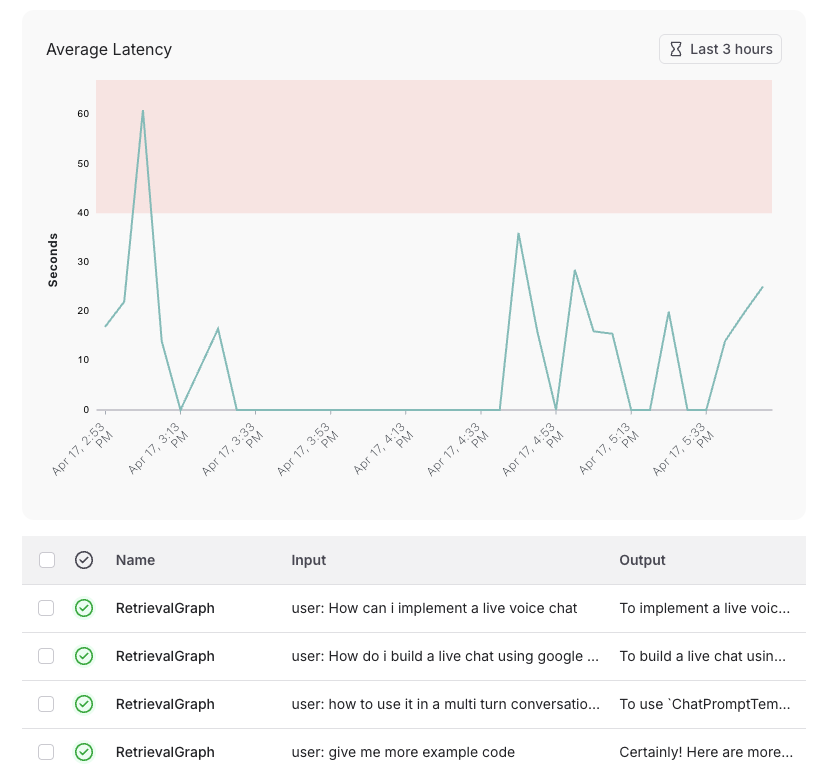 To configure this:
1. Save your alert.
2. Find your saved alert in the alerts table and click it.
3. Copy the displayed URL.
4. Click "Edit Alert".
5. Replace the existing project URL with the copied alert preview URL.
Here is an example for configuring LangSmith alerts to send notifications to a Microsoft Teams channel using the [Workflows app](https://support.microsoft.com/en-us/office/create-incoming-webhooks-with-workflows-for-microsoft-teams-8ae491c7-0394-4861-ba59-055e33f75498) (Power Automate). This approach is recommended because it extracts fields from the incoming JSON within the flow, so the auto-populated LangSmith alert fields render correctly in the Teams message.
Microsoft's legacy Office 365 Incoming Webhook connectors are being retired. Use the Workflows app for new integrations.
**Prerequisites**
* Access to a Microsoft Teams workspace with permissions to add Workflows.
* A LangSmith project to set up alerts.
**Step 1: Create a Workflow in Teams**
1. In Microsoft Teams, navigate to the channel where you want to receive alerts.
2. Click the **...** (More options) menu next to the channel name.
3. Select **Workflows**.
4. Search for and select the **Post to a channel when a webhook request is received** template.
5. Sign in to confirm the connections, then click **Next**.
6. Confirm the team and channel where alerts should be posted, then click **Add workflow**.
7. Copy the generated **HTTP POST URL**—use this in LangSmith.
**Step 2: Customize the message in Power Automate (optional)**
The default workflow posts the raw JSON body as a card. To format alert details, edit the flow in Power Automate:
1. Open the [Power Automate portal](https://make.powerautomate.com) and edit the workflow you created.
2. Click the **Post card in a chat or channel** action.
3. In the **Adaptive Card** field, reference incoming fields using `triggerOutputs()?['body/alert_rule_name']`, `triggerOutputs()?['body/project_name']`, `triggerOutputs()?['body/triggered_metric_value']`, `triggerOutputs()?['body/triggered_threshold']`, `triggerOutputs()?['body/timestamp']`, and `triggerOutputs()?['body/alert_rule_url']`.
4. Save the flow.
**Step 3: Configure the webhook alert in LangSmith**
1. In LangSmith, navigate to your project.
2. Select **Alerts → Create Alert**.
3. Define your alert metrics and conditions.
4. In the notification section, select **Webhook**.
5. Configure the webhook with the following settings:
**Webhook URL**
Paste the HTTP POST URL from your Teams Workflow:
```
https://prod-XX.westus.logic.azure.com:443/workflows/.../triggers/manual/paths/invoke?...
```
**Headers**
```json theme={"theme":{"light":"catppuccin-latte","dark":"catppuccin-mocha"}}
{
"Content-Type": "application/json"
}
```
**Request Body Template**
LangSmith automatically merges the auto-populated alert fields (`alert_rule_name`, `project_name`, `triggered_metric_value`, `triggered_threshold`, `timestamp`, `alert_rule_url`, and others) into the request body as top-level JSON keys. Power Automate reads these fields directly from the incoming payload, so an empty body is sufficient:
```json theme={"theme":{"light":"catppuccin-latte","dark":"catppuccin-mocha"}}
{}
```
6. Click **Save** to activate the webhook configuration.
**Step 4: Test the integration**
1. In the LangSmith alert configuration, click **Send Test Alert**.
2. Check your specified Teams channel for the test notification.
3. Verify that the card contains the expected alert information.
**Reference implementation**
For a working example that translates LangSmith webhook payloads (threshold alerts, run rules, and generic events) into formatted Teams Adaptive Cards, see the [langsmith-teams-webhook](https://github.com/langchain-samples/langsmith-teams-webhook) sample repo. The sample runs as a small Python service in front of a Teams Workflow URL, which avoids customizing the Power Automate flow itself.
Here is an example for configuring LangSmith alerts to send email notifications using [SendGrid's Mail Send API](https://docs.sendgrid.com/api-reference/mail-send/mail-send). You can use any transactional email provider that exposes an HTTP API (e.g., Mailgun, Amazon SES, Postmark).
**Prerequisites**
* A SendGrid account with a verified sender identity.
* A SendGrid API key with **Mail Send** permissions.
* A LangSmith project to set up alerts.
**Step 1: Create a SendGrid API key**
1. Log in to your [SendGrid dashboard](https://app.sendgrid.com).
2. Navigate to **Settings → API Keys**.
3. Click **Create API Key**.
4. Choose **Restricted Access** and enable **Mail Send → Full Access**.
5. Click **Create & View**, copy the key, and store it securely.
**Step 2: Verify your sender email**
1. In SendGrid, navigate to **Settings → Sender Authentication**.
2. Complete either **Domain Authentication** (recommended) or **Single Sender Verification** for the address you want to send from.
**Step 3: Configure the webhook alert in LangSmith**
1. In LangSmith, navigate to your project.
2. Select **Alerts → Create Alert**.
3. Define your alert metrics and conditions.
4. In the notification section, select **Webhook**.
5. Configure the webhook with the following settings:
**Webhook URL**
```
https://api.sendgrid.com/v3/mail/send
```
**Headers**
Replace `SG.your-api-key-here` with your SendGrid API key.
```json theme={"theme":{"light":"catppuccin-latte","dark":"catppuccin-mocha"}}
{
"Content-Type": "application/json",
"Authorization": "Bearer SG.your-api-key-here"
}
```
**Request Body Template**
Replace `alerts@your-company.com` with your verified sender address and `oncall@your-company.com` with the recipient address. SendGrid does not extract fields from arbitrary top-level JSON keys, so this example uses a fixed subject and body. To include alert-specific values in the email, route the LangSmith webhook through a middleware (such as a Power Automate flow, AWS Lambda, or Zapier webhook) that reads the incoming payload and renders the SendGrid request.
```json theme={"theme":{"light":"catppuccin-latte","dark":"catppuccin-mocha"}}
{
"personalizations": [
{
"to": [
{
"email": "oncall@your-company.com"
}
],
"subject": "LangSmith alert triggered"
}
],
"from": {
"email": "alerts@your-company.com",
"name": "LangSmith Alerts"
},
"content": [
{
"type": "text/plain",
"value": "A LangSmith alert was triggered. Open your LangSmith workspace to view the alert details, including the project, metric value, threshold, and timestamp."
}
]
}
```
6. Click **Save** to activate the webhook configuration.
**Step 4: Test the integration**
1. In the LangSmith alert configuration, click **Send Test Alert**.
2. Check the recipient inbox for the test notification.
3. Verify the email contains the expected alert information.
**Using other email providers**
The same pattern works with other transactional email APIs that accept static authentication headers. Change the **Webhook URL** and **Headers** to match your provider:
| Provider | Webhook URL | Auth header format |
| -------- | --------------------------------------------------- | ------------------------------------------ |
| Mailgun | `https://api.mailgun.net/v3/{your-domain}/messages` | `Authorization: Basic )>` |
| Postmark | `https://api.postmarkapp.com/email` | `X-Postmark-Server-Token: ` |
Adjust the **Request Body Template** to match each provider's expected payload format. Amazon SES is not directly compatible because the SES API requires per-request AWS SigV4 signing, which cannot be expressed as a static header. To use SES, route through a middleware (for example, a Lambda function with an HTTP trigger).
### Additional resources
* [Slack chat.postMessage API Documentation](https://api.slack.com/methods/chat.postMessage)
* [Slack Block Kit Builder](https://app.slack.com/block-kit-builder/)
* [Create incoming webhooks with Workflows for Microsoft Teams](https://support.microsoft.com/en-us/office/create-incoming-webhooks-with-workflows-for-microsoft-teams-8ae491c7-0394-4861-ba59-055e33f75498)
* [Power Automate documentation](https://learn.microsoft.com/en-us/power-automate/)
* [langsmith-teams-webhook sample repo](https://github.com/langchain-samples/langsmith-teams-webhook)
* [SendGrid Mail Send API Documentation](https://docs.sendgrid.com/api-reference/mail-send/mail-send)
## Best practices
* Adjust sensitivity based on application criticality
* Start with broader thresholds and refine based on observed patterns
* Ensure alert routing reaches appropriate on-call personnel
***
To configure this:
1. Save your alert.
2. Find your saved alert in the alerts table and click it.
3. Copy the displayed URL.
4. Click "Edit Alert".
5. Replace the existing project URL with the copied alert preview URL.
Here is an example for configuring LangSmith alerts to send notifications to a Microsoft Teams channel using the [Workflows app](https://support.microsoft.com/en-us/office/create-incoming-webhooks-with-workflows-for-microsoft-teams-8ae491c7-0394-4861-ba59-055e33f75498) (Power Automate). This approach is recommended because it extracts fields from the incoming JSON within the flow, so the auto-populated LangSmith alert fields render correctly in the Teams message.
Microsoft's legacy Office 365 Incoming Webhook connectors are being retired. Use the Workflows app for new integrations.
**Prerequisites**
* Access to a Microsoft Teams workspace with permissions to add Workflows.
* A LangSmith project to set up alerts.
**Step 1: Create a Workflow in Teams**
1. In Microsoft Teams, navigate to the channel where you want to receive alerts.
2. Click the **...** (More options) menu next to the channel name.
3. Select **Workflows**.
4. Search for and select the **Post to a channel when a webhook request is received** template.
5. Sign in to confirm the connections, then click **Next**.
6. Confirm the team and channel where alerts should be posted, then click **Add workflow**.
7. Copy the generated **HTTP POST URL**—use this in LangSmith.
**Step 2: Customize the message in Power Automate (optional)**
The default workflow posts the raw JSON body as a card. To format alert details, edit the flow in Power Automate:
1. Open the [Power Automate portal](https://make.powerautomate.com) and edit the workflow you created.
2. Click the **Post card in a chat or channel** action.
3. In the **Adaptive Card** field, reference incoming fields using `triggerOutputs()?['body/alert_rule_name']`, `triggerOutputs()?['body/project_name']`, `triggerOutputs()?['body/triggered_metric_value']`, `triggerOutputs()?['body/triggered_threshold']`, `triggerOutputs()?['body/timestamp']`, and `triggerOutputs()?['body/alert_rule_url']`.
4. Save the flow.
**Step 3: Configure the webhook alert in LangSmith**
1. In LangSmith, navigate to your project.
2. Select **Alerts → Create Alert**.
3. Define your alert metrics and conditions.
4. In the notification section, select **Webhook**.
5. Configure the webhook with the following settings:
**Webhook URL**
Paste the HTTP POST URL from your Teams Workflow:
```
https://prod-XX.westus.logic.azure.com:443/workflows/.../triggers/manual/paths/invoke?...
```
**Headers**
```json theme={"theme":{"light":"catppuccin-latte","dark":"catppuccin-mocha"}}
{
"Content-Type": "application/json"
}
```
**Request Body Template**
LangSmith automatically merges the auto-populated alert fields (`alert_rule_name`, `project_name`, `triggered_metric_value`, `triggered_threshold`, `timestamp`, `alert_rule_url`, and others) into the request body as top-level JSON keys. Power Automate reads these fields directly from the incoming payload, so an empty body is sufficient:
```json theme={"theme":{"light":"catppuccin-latte","dark":"catppuccin-mocha"}}
{}
```
6. Click **Save** to activate the webhook configuration.
**Step 4: Test the integration**
1. In the LangSmith alert configuration, click **Send Test Alert**.
2. Check your specified Teams channel for the test notification.
3. Verify that the card contains the expected alert information.
**Reference implementation**
For a working example that translates LangSmith webhook payloads (threshold alerts, run rules, and generic events) into formatted Teams Adaptive Cards, see the [langsmith-teams-webhook](https://github.com/langchain-samples/langsmith-teams-webhook) sample repo. The sample runs as a small Python service in front of a Teams Workflow URL, which avoids customizing the Power Automate flow itself.
Here is an example for configuring LangSmith alerts to send email notifications using [SendGrid's Mail Send API](https://docs.sendgrid.com/api-reference/mail-send/mail-send). You can use any transactional email provider that exposes an HTTP API (e.g., Mailgun, Amazon SES, Postmark).
**Prerequisites**
* A SendGrid account with a verified sender identity.
* A SendGrid API key with **Mail Send** permissions.
* A LangSmith project to set up alerts.
**Step 1: Create a SendGrid API key**
1. Log in to your [SendGrid dashboard](https://app.sendgrid.com).
2. Navigate to **Settings → API Keys**.
3. Click **Create API Key**.
4. Choose **Restricted Access** and enable **Mail Send → Full Access**.
5. Click **Create & View**, copy the key, and store it securely.
**Step 2: Verify your sender email**
1. In SendGrid, navigate to **Settings → Sender Authentication**.
2. Complete either **Domain Authentication** (recommended) or **Single Sender Verification** for the address you want to send from.
**Step 3: Configure the webhook alert in LangSmith**
1. In LangSmith, navigate to your project.
2. Select **Alerts → Create Alert**.
3. Define your alert metrics and conditions.
4. In the notification section, select **Webhook**.
5. Configure the webhook with the following settings:
**Webhook URL**
```
https://api.sendgrid.com/v3/mail/send
```
**Headers**
Replace `SG.your-api-key-here` with your SendGrid API key.
```json theme={"theme":{"light":"catppuccin-latte","dark":"catppuccin-mocha"}}
{
"Content-Type": "application/json",
"Authorization": "Bearer SG.your-api-key-here"
}
```
**Request Body Template**
Replace `alerts@your-company.com` with your verified sender address and `oncall@your-company.com` with the recipient address. SendGrid does not extract fields from arbitrary top-level JSON keys, so this example uses a fixed subject and body. To include alert-specific values in the email, route the LangSmith webhook through a middleware (such as a Power Automate flow, AWS Lambda, or Zapier webhook) that reads the incoming payload and renders the SendGrid request.
```json theme={"theme":{"light":"catppuccin-latte","dark":"catppuccin-mocha"}}
{
"personalizations": [
{
"to": [
{
"email": "oncall@your-company.com"
}
],
"subject": "LangSmith alert triggered"
}
],
"from": {
"email": "alerts@your-company.com",
"name": "LangSmith Alerts"
},
"content": [
{
"type": "text/plain",
"value": "A LangSmith alert was triggered. Open your LangSmith workspace to view the alert details, including the project, metric value, threshold, and timestamp."
}
]
}
```
6. Click **Save** to activate the webhook configuration.
**Step 4: Test the integration**
1. In the LangSmith alert configuration, click **Send Test Alert**.
2. Check the recipient inbox for the test notification.
3. Verify the email contains the expected alert information.
**Using other email providers**
The same pattern works with other transactional email APIs that accept static authentication headers. Change the **Webhook URL** and **Headers** to match your provider:
| Provider | Webhook URL | Auth header format |
| -------- | --------------------------------------------------- | ------------------------------------------ |
| Mailgun | `https://api.mailgun.net/v3/{your-domain}/messages` | `Authorization: Basic )>` |
| Postmark | `https://api.postmarkapp.com/email` | `X-Postmark-Server-Token: ` |
Adjust the **Request Body Template** to match each provider's expected payload format. Amazon SES is not directly compatible because the SES API requires per-request AWS SigV4 signing, which cannot be expressed as a static header. To use SES, route through a middleware (for example, a Lambda function with an HTTP trigger).
### Additional resources
* [Slack chat.postMessage API Documentation](https://api.slack.com/methods/chat.postMessage)
* [Slack Block Kit Builder](https://app.slack.com/block-kit-builder/)
* [Create incoming webhooks with Workflows for Microsoft Teams](https://support.microsoft.com/en-us/office/create-incoming-webhooks-with-workflows-for-microsoft-teams-8ae491c7-0394-4861-ba59-055e33f75498)
* [Power Automate documentation](https://learn.microsoft.com/en-us/power-automate/)
* [langsmith-teams-webhook sample repo](https://github.com/langchain-samples/langsmith-teams-webhook)
* [SendGrid Mail Send API Documentation](https://docs.sendgrid.com/api-reference/mail-send/mail-send)
## Best practices
* Adjust sensitivity based on application criticality
* Start with broader thresholds and refine based on observed patterns
* Ensure alert routing reaches appropriate on-call personnel
***
[Connect these docs](/use-these-docs) to Claude, VSCode, and more via MCP for real-time answers.
[Edit this page on GitHub](https://github.com/langchain-ai/docs/edit/main/src/langsmith/alerts.mdx) or [file an issue](https://github.com/langchain-ai/docs/issues/new/choose).